

New DB project with SSDT and import existing database
DevOps & databases with SSDT in practice
With this episode I would like to commence long-awaited new series
It’s about DevOps with databases. I’ll start with SSDT, but not exclude other tools (like Redgate ReadyRoll) in the future.
Starting from the very basic things, we will travel through entire process to see and understand how to work, develop, tests and maintenance database project within company.
In this very first episode I’ll introduce SSDT and show up how to create empty database project and how to import existing databases from physical server with 3 methods:
1) Import from database (connect to server)
2) Import from DACPAC
3) Import from script
Let’s get the ball rolling
What is SSDT?
SSDT – SQL Server Data Tools.
It is a free add-in? from Microsoft to Visual Studio which allows you create a database project (like a Desktop Application or Console project in VB/C# but for database).

Why do we need SSDT?
Have you ever written a code in VB(.NET), C#/++ or other to build application? Imagine that you need to write entire application only in your mind or using notepad. Skipping the fact, that a code was being written in that way (C) and writing HTML code is a different kettle of fish and doesn’t count. Hence, using SSDT you have a tool to maintain a database project and it allows you:
- verify query statements (T-SQL)
- validate data/column types
- validate compatibility with specific version of SQL Server (SQL Server 2005! – Azure SQL Database v12)
- prepare repeatable build process
- compare and find the differences (i.e. between project and database)
- apply standards & best practices onto your enterprise or customer
- and eventually, create an automated process of deployment
Certainly, there are much more than those mentioned. If you know another one that I’ve missed – leave it in comments below, please.
How to get it?
You have two options:
1) Choose it from Visual Studio installer. Now it’s one of the modules you can simply select during installation.
Have Visual Studio already installed? No worries. Just run the installer again, do add required module.
2) Go to the website and download appropriate extension depending from your Visual Studio. Afterwards install it and run Visual Studio.
How to check whether I have SSDT on board?
Run Visual Studio and go to the menu: “Help” -> “About Microsoft Visual Studio” Opened window will reveal what modules you’ve installed.
Do find “SQL Server Data Tools” on the list and you’ll find out the version as well.
Other way is to create new project trying to find “SQL Server Database Project” node. Can you see it? Good. You can use SSDT within VS.
New (empty) database project
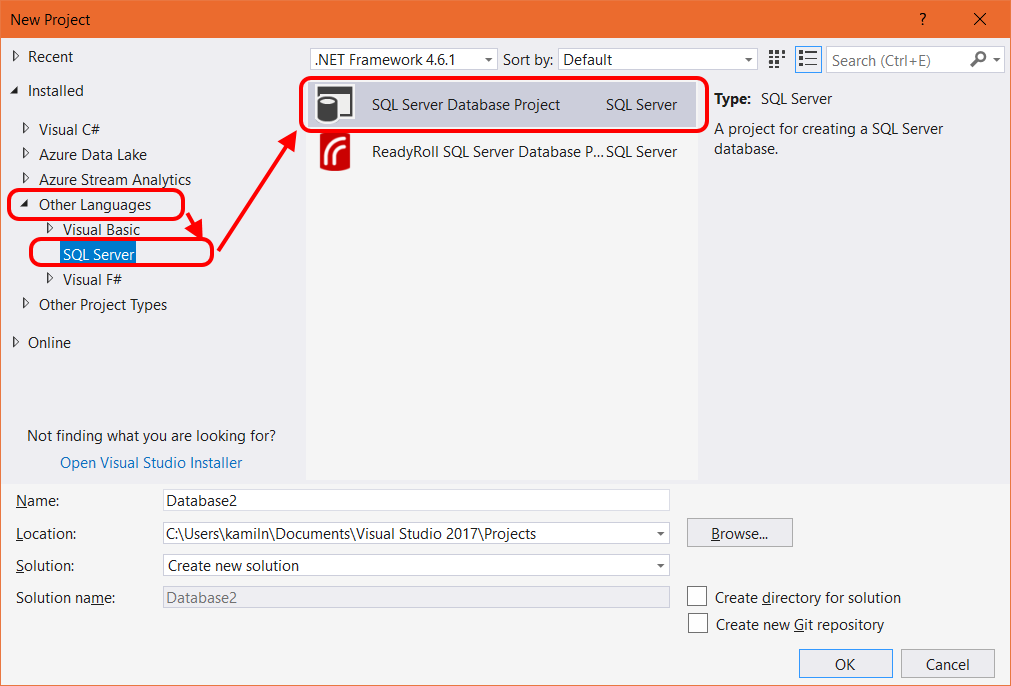
Once you open Visual Studio – go to the menu: File -> New -> Project.
New window will be opened and then find the project type: SQL Server Database Project.
Having an empty database project you can either create new objects and create new database from the scratch or import existing one.
You can import the databases following one of 3 methods.

Import database from Data-Tier Application (dacpac file)
One of less popular option, in my opinion. You can create dacpac file using SSMS, for example.
DACPAC file is a zipped file which contains all information about database model. I’ll describe it more in separate post.
Anyways, it’s not a perfect method as export DACPAC file might be very tough, especially when your database has got errors, i.e. unresolved references.
But let’s assume that you already have one.
Right-click on database node in your new project and select Import -> Data-tier application.
Find needed *.dacpac file, decide whether you want to import permissions and/or database settings and click Start.
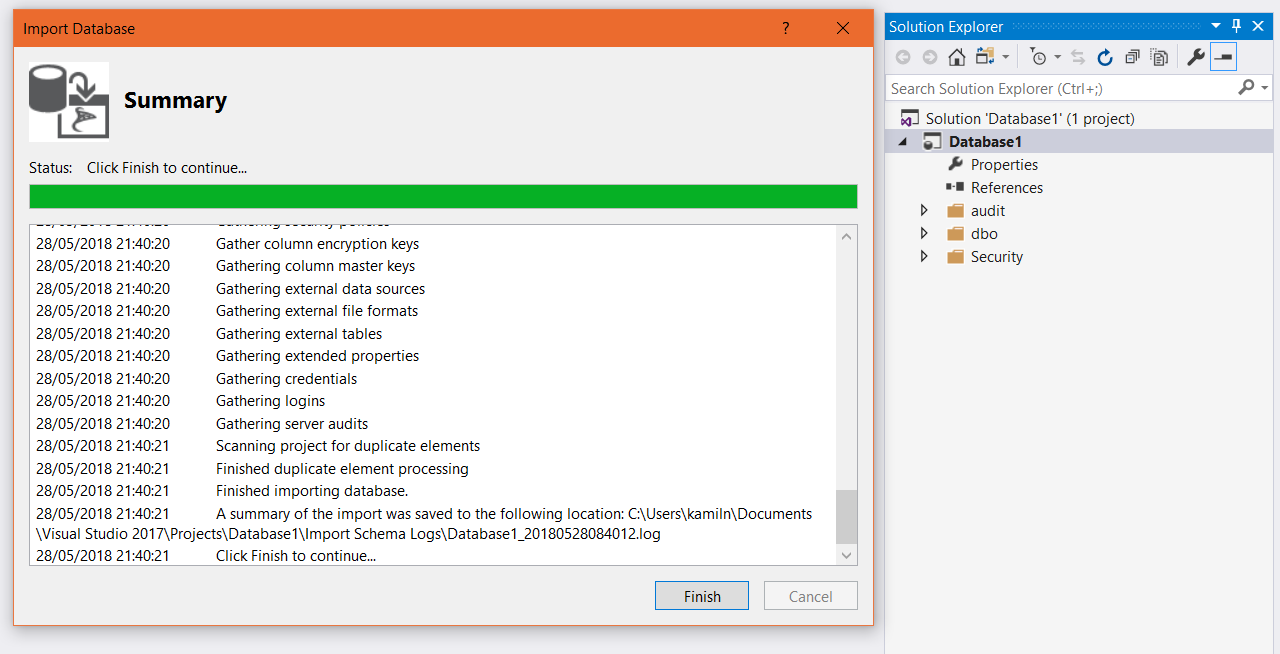
New window will be opened and the process commences. The summary of import will be created in a log file.
Import database from server
 This kind of import is useful when you have access to the SQL server with database to import. The limitation is that you can do it only once.
If you already have some object in the project – this option is disabled. To re-enabled it, you must delete all objects (files) from the project.
Anyways, I use this option whenever I can. Why? You do not miss any objects or properties and you do not rely on other people who might have done the dacpac file (or script) wrongly. Thus, if I can do something faster and without additional risk, why not?
Right-click on database node in your new project and select Import -> Database….
In the Import Database window you need to choose a connection to source database. Even if you don’t have any – click Select Connection…
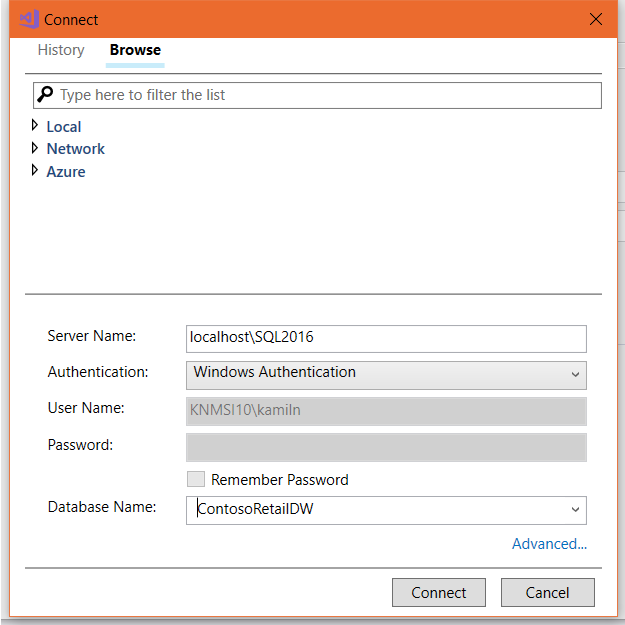
Pick up one of the existing connections you’ve used previously (tab History) or create new one (tab Browse).
Put a server name (including its instance name when required), select appropriate authentication method and database name (list should be populated when all above information are correct and your access is valid).
Then do click Connect and you’ll be ready to click Start to commence the import process.
Import database from script (sql file)
When you have no access to source server – this is option is for you. The script can be generated by someone else and you can use it to import a model. This option is very handy also in a case when part of a databases has been imported already or if you want to import only selected objects. In other words – this option is reusable.
Further more, one or more files might be imported during one pass. All files are being interpreted and the database objects defined in those scripts are added to your project.
What happens once your objects you’re importing already exist? Don’t worry. SSDT will not overwrite them entirely with a new version. Objects will be merged. Cool, isn’t it?
How create SQL script of database?
Simple. Use our favorite tool – SSMS.
Open SQL Server Management Studio, do right-click on the database name, Task -> Generate scripts.
Then you’ll be able to select specific database objects you want to script. Or simply select Script entire database and all database objects option. In the next step (“Set Scripting Options”) choose between:
- Save script to file and
a) create one (big) file or single file per object
b) Target directory
c) Encoding of file(s) - Save (copy) script to Clipboard
- Save to new query window – Open new window with generated script in SSMS
 Also, you have more control over what the script containing. There is small, shy button Advanced, but very underestimated and powerful.
Before you click Next and generate the script, I would suggest to check all options behind the scenes.
The following options are very important in our case, so set them as TRUE:
- Script Owner
- Script Indexes
- Script Triggers
These options also can be important – depends on your database:
- Script Collation
- Script Change Tracking
- Script Data Compression Options
Why did I say that the Advanced Scripting Options are underestimated?
Due to “Types of data to script”. The property, by default, has value “Schema only”, but you might select one out of:
- Data only
- Schema and data
- Schema only
Data. Yes, you can see it correctly. SSMS CAN script DATA for you. Maybe not in a very efficient way, as it’s scripted as many INSERT statements (one per row), but it’s free. Bear in mind that the script with data is completely useless in our case. Why? SSDT cannot keep data in a project. How to workaround this, I will explain in a future post in this series.
Which an environment should I do import?
The best source of the database would be a production server. In most cases, enterprises which didn’t adopt DevOps culture – the databases between environments are slightly different. In many places, for many reasons. It’s a common scenario, don’t worry. But production is production; the environment which the customers, stakeholders work on. If that works (because it works, right?) – this should be your image, your only version of the truth. Afterwards, you can create branches and import rest of environments to reflect their changes.
Import complete
When the whole process comes to the end you will see the summary of import and copy of that information will be created in a log file. All the objects from the source (depend on which way did you choose) have been created in the project under the folders (see below).
Any questions?
That’s all in this episode. Do you have any question about above or another topic around DevOps and/or databases? Put them in comments or send via a contact form. And please do remember that next episode of the series will appear soon.
Thanks for reading.
Updated @ 08/11/2019
This post is already part of the whole series about SSDT.
About author

You might also like
SSDT (SqlPackage) thread crashes with error when publishing
In this post, I will show you one of the scenarios when SSDT (SQL Server Data Tools) can fail unexpectedly while publishing database project to target server or preparation of
SSDT: Scripting static data from SQL Server (video)
Out of the box, SSDT covers objects on a database level, like tables, stored procedures, views, functions, etc. That means schema only. In many cases, there is a need to

Script and deploy the data for database from SSDT project
This post is a part of the series about SSDT and database project leveraging Visual Studio. We already know that SSDT can cover all objects but only on a database
Leave a Reply


17 Comments
Kamil Nowinski
October 02, 21:29I’ve created a database project in VS 2016. I need to change the “Import From” database. I don’t want to start a new project because this is all checked into TFS. I’d rather modify the existing configuration.
How to create DACPAC file? | SQLPlayer
November 08, 22:39[…] I described in the previous post (New DB project with SSDT and import existing database) in this series, usage the DACPAC file is one of the methods of importing objects to an empty, SSDT […]
Atul pandey
November 11, 07:01Very nicely explain How to import database files to our other database file. The way you have shared the information is really good. Thanx for sharing this information.
Deployment of Microsoft SQL database with Azure DevOps | SQL Player
December 12, 01:09[…] and their maintenance in SSDT project on the blog. One of the posts explained step by step how to import a database from a production environment and thus create the SSDT project. In this video, I will explain to […]
Anu
September 07, 17:38Hi, I am trying to automate the database deployment using SSDT from Jenkins. How will I fetch the Data changes also since DACPAC file has only schema changes?
What are the steps that I should follow? This should include data scripts as well.
Kamil Nowinski
October 16, 19:22Anu, I don’t have experience with Jenkins, but for sure you can run MSBuild to create DACPAC file and then deploy the DACPAC into target server using SQLPackage.exe. I found a good article written by my friend Gavin:
https://gavincampbell.dev/post/jenkins-windows-git-ssdt-profit/
In terms of data: you must script data into a file and execute it on the Post-Deployment file. In that way – your data gonna be part of DACPAC file and you have nothing to do extra for deployment. More details here: https://azureplayer.net/2019/10/script-deploy-the-data-for-database-from-ssdt-project/
SQL_Rookie
November 12, 16:42Hi Kamil,
I followed your post & videos and imported the database via SSDT(SQL server object explorer ) to create a new project and to add it into Azure devops but I dont want the security folder to be added into the project. From the production copy, I want to create a a new DEV database. How can I remove Security folder ?
Thanks
Sandy
Kamil Nowinski
April 14, 08:16SQL_Rookie,
You can remove every single object (file) which you do not need anymore. It will reveal any potential dependencies and it works as long as the database project compiles. Remember, the security folder contains schema objects as well.
ab
March 31, 18:46Hi Kamil,
Thank you the nice post , I have few question if you can provide suggestion based on the experience .
– Should I be including view and store proc in the object when I import? is it good practice or any suggestion ?
– Any suggestion on dealing with security object ?
Kamil Nowinski
April 14, 08:05Import views and stored procedures? Absolutely you should.
In terms of security objects – do you have a specific question? I have some examples in GitHub repo: https://github.com/NowinskiK/ssdt-training/tree/master/src
Generally, it really depends on what you are looking for. Use pre/post-deployment scripts for any extra work.
Pierre
June 08, 21:32Hello Kamil,
Does SSDT have a deploy once option like Sql Change Automation (ReadyRoll)?
To only run a script once? The only solution I have found is to do a post deployment script.
I appreciate the articles!
Thanks,
Pierre
Kamil Nowinski
June 21, 18:33The SSDT does use a state-based approach, which means it will create the differential script first, and then the script is your “one-off” script to be executed. Apart from that, you’re right – as a hybrid model you can use pre or post-deployment script but they are always executed. However, you can use some tools like Flyway to control the deployment of migration scripts. Just today I published short video about Flyway:
https://youtu.be/9eOhcAsl17c
Tbanyan
December 20, 15:56After the import, the Security folder had an extra credential for the login (login_1) used for the import with an encrypted password. Why and is this a security risk?
Kamil Nowinski
April 11, 15:24Probably you imported it twice to the same folder where the previous object (login) already existed.
kahanu
September 21, 21:29You didn’t address how the SQL script that was created using SSMS was imported using the SSDT tools. It didn’t like the scripts I created using SSMS.
Vaishnavi
November 15, 05:50Hi, I am currently trying to update the changes from VS2019 to SQL-Server DB.
I have noticed schema-compare update and Publish the code, can you please let me know which is the better way to update the DB in SQL server from VS2019.
Kamil Nowinski
December 02, 17:38Hey. Schema compare tool is good for ad-hoc comparisons and for update selected objects (tables, views, etc), ano only for specific reasons on dev environment. Otherwise, use Publish, which includes pre and post deployment scripts as well. Check out this free lesson from my course which may shed some light into the topic: https://learn.azureplayer.net/view/courses/database-projects-with-ssdt-dacpac/734804-module-5/2281366-introduction