

Preparation for SQL Server installation
It is a first post on series related to installation and configuration of SQL Server installations.
This series is for professionals who starts their journey with SQL Server administration and also for those who want to extend and structure their knowledge on SQL Server administration.
Preparations
We are starting with following assumptions:
- It is brand new installation on standalone server
- We are using Windows Server as an operating system
- Server is up to date with all security updates from Windows Update
- Database server is a part of Active Directory domain
- Active Directory schema is at least the Windows Server 2012 domain functional level
- All drives used for SQL Server are configured as independent LUNs
- Latest publicly available version of SQL Server will be used.
As a first step we need to check if all prerequisites for the installation are met. Most important is to have .NET framework installed and server is restarted before installation.
For installation of .NET framework, we need to have ISO file of the Windows Server.
How to install .NET Framework in Windows Server environment?
As a first step start Server Manager and go to Manage -> Add Roles and Features

On Before you begin screen click Next

On Select installation type screen select Role-based or feature-based installation and click Next

On Select destination server choose Select a server from server pool and select the server and click Next

On Select server roles click Next

On Select features screen expand .NET Framework 3.5 Features and select .NET Framework 3.5 (includes .NET 2.0 and 3.0) and click Next

Click on Install to proceed with installation.
You can also check if .NET is installed using PowerShell command:
Get-WindowsFeature -Name Net-Framework-Core

Configuration of the disks for SQL Server
Once .NET is installed we can proceed to configuration of separate drives for usage by SQL Server – it is common practice due to mainly performance advantages of this setup.
In my lab environment, I will be using following drives:
- D:\ for binaries of SQL Server and system databases
- 3 drives for Data files of user databases configured as mount points on D:\ drive
- 1 drive for Transaction Log of user databases configured as mount points on D:\ drive
- 4 drives for tempdb configured as mount points on D:\ drive – in my lab I am using virtual machine with 4 cores thus 4 separate disks should be used. As a starting point, you should start with 1 tempdb data file per CPU core up to 8 files
- 1 drive for backups configured as mount points on D:\ drive
Before we start with installation, it is required to format drives with desired settings. You may wonder what can be configured with configuration? Yes, there are some settings that should be adjusted for drives used by SQL Server:
- File system – SQL Server support NTFS and ReFS
- Allocation unit – should be changed from default (512 bytes) set to 64k for drives used for data
- Deselect “Perform quick format” option – this option will force to format physical storage, avoid dynamic allocation. This will minimize random performance hiccups during normal operation.
As a first drive will be used, I will configure it as a normal drive with D:\ drive letter. Below step-by-step screen shots how to configure the drive.

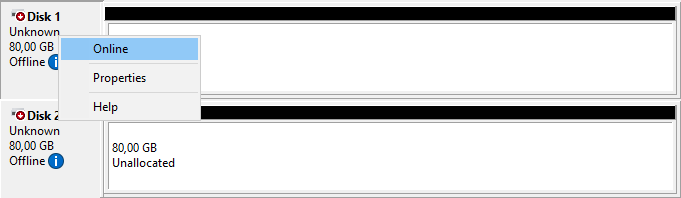
Browse to Computer Management (Local) -> Storage -> Disk Management and right-click on first disk

Select Online option
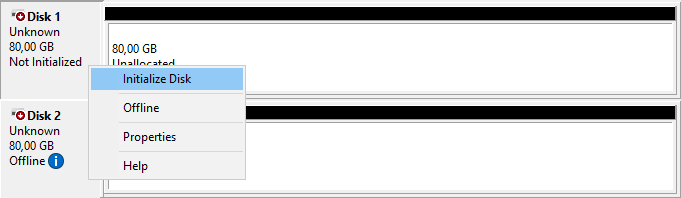
Once disk is switched from Offline state to Not Initialized right-click and select Initialize Disk
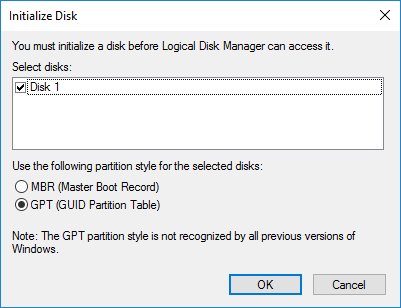
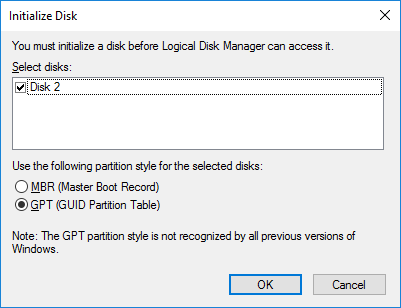
On Initialize Disk pop-up select all disks and use GPT (GUID Partition Table) option
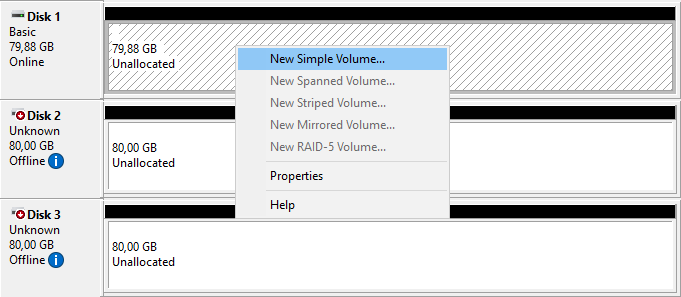
Disk should change it’s state to Online

Right-click Unallocated space and select New Simple Volume…
On the New Simple Volume Wizard click Next

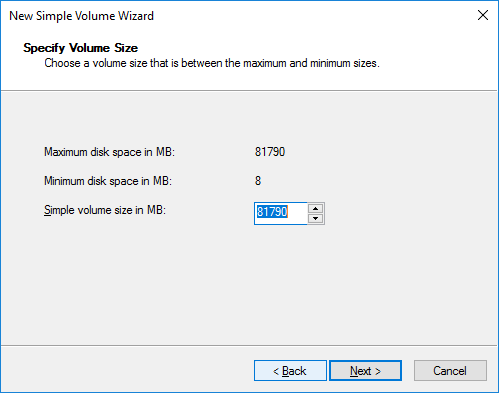
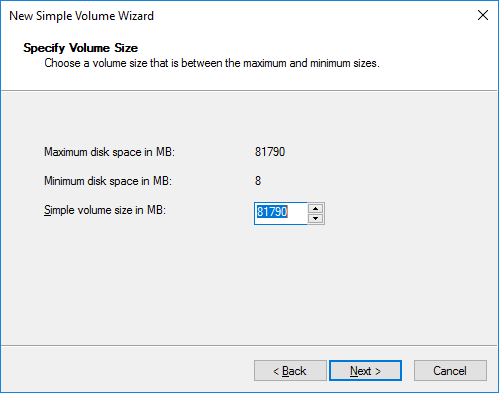
On the Specify Volume Size provide size of the volume and click Next
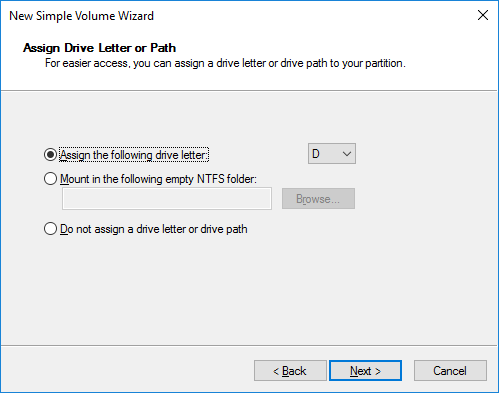
On the Assign Drive Letter or Path select D drive and click Next
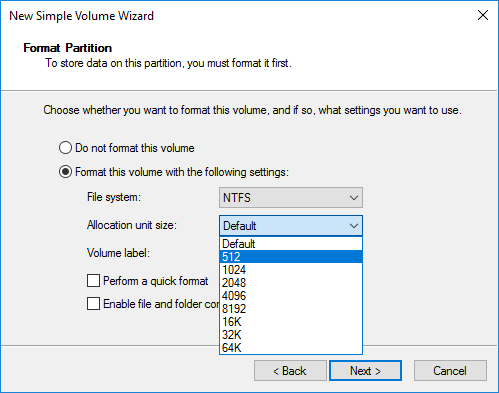
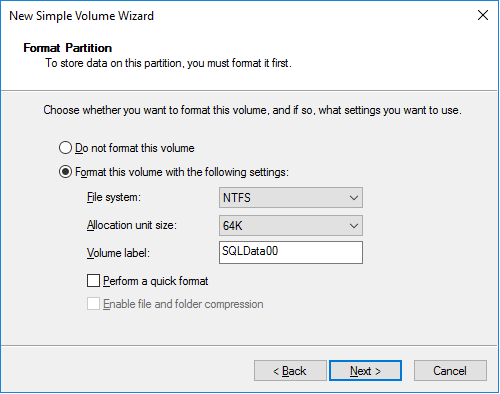
On Format Partition select NTFS file system and correct allocation unit – for all drives used for storing users data files, allocation unit should be set to 64K. Here we are formatting drive for binaries of SQL Server thus using default 512. Deselect Perform a quick format option.
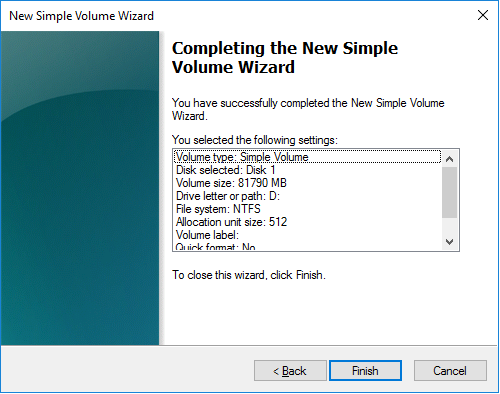
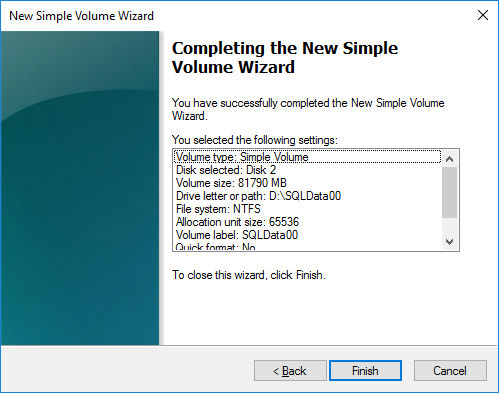
On the summary screen click on Finish to start formatting of the drive.
Next drives will be configured as a mount points on the D:\ drive. I am using mount points due to fact that it is not commonly used and can help us with having too many drives in the system (situation when all drives letters are used).
Below step-by-step screen shots how to configure the drive as a mount point.
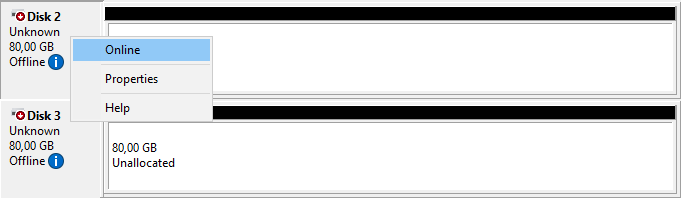
Right click on Disk 2 and select Online
On Initialize Disk pop-up select all disks and use GPT (GUID Partition Table) option
Right-click Unallocated space and select New Simple Volume…

On the Specify Volume Size provide size of the volume and click Next
On the Assign Drive Letter or Path select Mount in the following empty NTFS folder and click Browse…
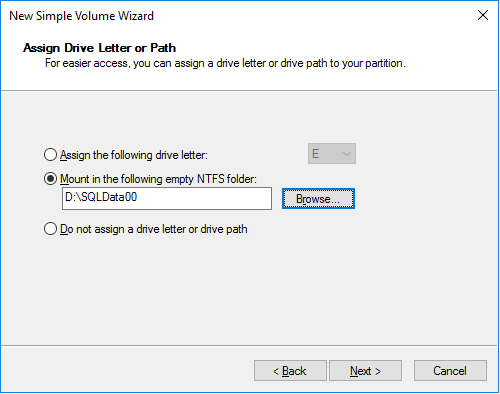
Select D:\ drive and click on New Folder… to create folder called SQLData00. Select this folder and click OK

On Format Partition select NTFS file system and 64K allocation unit, provide Volume Label (SQLData00) and Deselect Perform a quick format option.
On the summary screen click on Finish to start formatting of the drive.
Repeat the same steps for the other drives (SQLData01-02, SQLTLog, SQLTempDB01-04 and SQLBackup). Once all steps are completed you should see following drives in This PC:

When browsing to D:\ drive all mount points should be visible and in online state.

Group Managed Service Accounts for SQL Server
One of the new feature of the Windows Server 2008 R2 was Managed Service Account (MSA). This feature allows you to create an Active Directory account that is tied to specific computer object with complex password and automatic process of password renewal (like for the computer object). Such object significantly increase security as the Database Administrator (DBA) doesn’t need to change password for SQL Server accounts. One of the restriction of the MSA was that it can’t be used for more than one computer. This limitation was solved new feature in Windows Server 2012 called Group Managed Service Account (gMSA). Below there are steps describing how enable gMSA on Active Directory and how to configure SQL Server to take advantage of it.
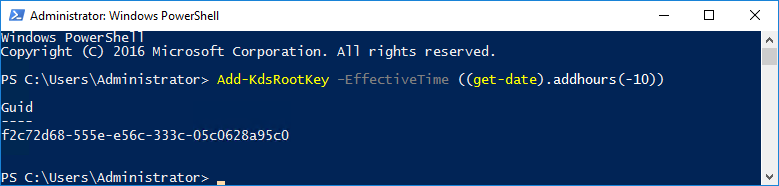
As a first step Key Distribution Service (KDC) Root Key needs to be created. For that we are going to execute PowerShell command on domain controller by user with Domain Administrator or Enterprise Administrator privileges.
As we don’t want to wait default 10 hours, additional parameter -EffectiveTime has been used:
Add-KdsRootKey –EffectiveTime ((get-date).addhours(-10))
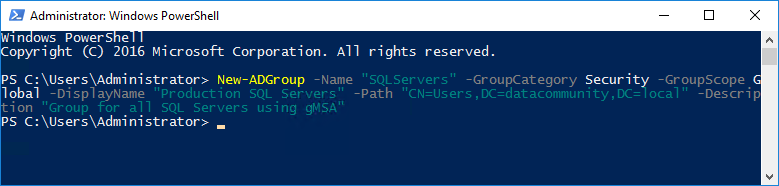
Second step is to created Global Security Group for all Computers where SQL Server will be installed
New-ADGroup -Name "SQLServers" `
-GroupCategory Security `
-GroupScope Global `
-DisplayName "Production SQL Servers" `
-Path "CN=Users,DC=datacommunity,DC=local" `
-Description "Group for all SQL Servers using gMSA"
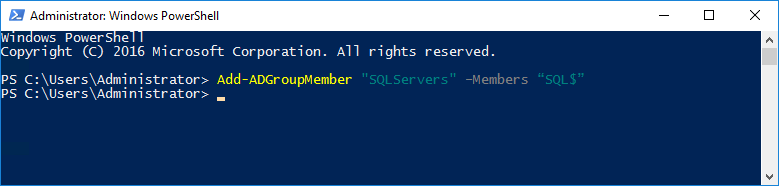
Third step is to add all SQL Server computers to the group created in previous step:
Add-ADGroupMember "SQLServers" –Members “SQL$”
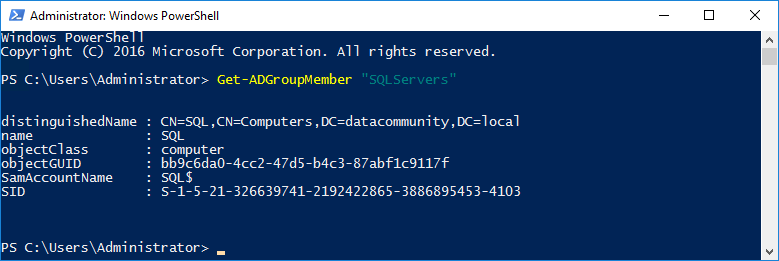
To validate memebers of the AD Group, following command can be used:
Get-ADGroupMember "SQLServers"
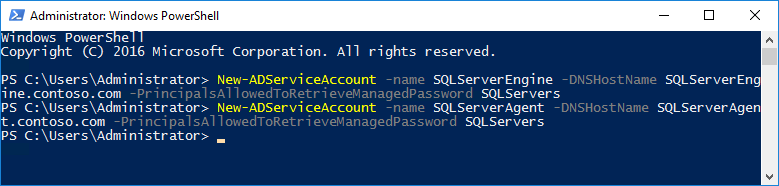
Fourth step is to create gMSA accounts for all services that we are going to use – in our case two accounts:
- SQL Server Database Engine
- SQL Server Agent
To add accounts following PowerShell command can be executed:
New-ADServiceAccount -name SQLServerEngine `
-DNSHostName SQLServerEngine.contoso.com `
-PrincipalsAllowedToRetrieveManagedPassword SQLServers

New-ADServiceAccount -name SQLServerAgent `
-DNSHostName SQLServerAgent.contoso.com `
-PrincipalsAllowedToRetrieveManagedPassword SQLServers
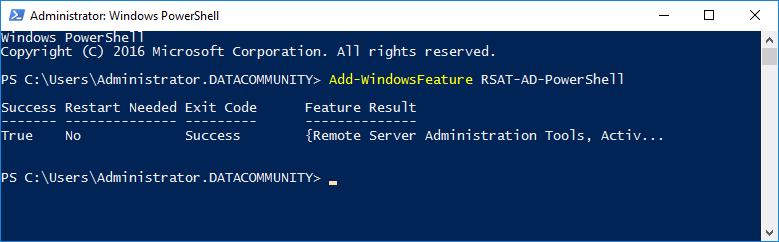
On the member server (SQL computer in our case) there are additional steps that needs to be executed:
Import AD module by running:
Add-WindowsFeature RSAT-AD-PowerShell
Both gMSA accounts needs to be installed on the member server by running following command:
Install-ADServiceAccount SQLServerEngine
Install-ADServiceAccount SQLServerAgent

To check if gMSA are installed correctly you can run Test-ADServiceAccount cmdlet:
Test-ADServiceAccount SQLServerEngine
Test-ADServiceAccount SQLServerAgent

After this step – Active Directory domain and member server are ready for the installation of SQL Server.
Summary
Proper configuration of the Active Directory (AD) domain and operating system can give significant performance, security and manageability advantages. Every time when you build new server for SQL Server, check if all steps described in this blog post are configured.
Links
More information about described above steps can be found on following sites:
https://docs.microsoft.com/en-us/dotnet/framework/install/on-windows-10
https://docs.microsoft.com/en-us/windows-server/storage/disk-management/overview-of-disk-management
https://docs.microsoft.com/en-us/windows-server/security/group-managed-service-accounts/group-managed-service-accounts-overview
https://docs.microsoft.com/en-us/previous-versions/sql/sql-server-2008/dd758814(v=sql.100)
About author

You might also like

What is containerization?
It is the first post on series related to installation and configuration of containers on the Microsoft Windows platform. This series is for professionals who start their journey with the

Configuration of SQL Server instance
It is the fifth post on series related to installation and configuration of SQL Server client tools required. This series is for professionals who start their journey with SQL Server

Installation SQL Server client tools
It is the fourth post on series related to installation and configuration of SQL Server client tools required. This series is for professionals who start their journey with SQL Server
Leave a Reply


3 Comments
Configuration of SQL Server instance | SQLPlayer
June 18, 08:01[…] steps described in this first blog post has been […]
Sang Ho
June 12, 16:44Hi Michal.
I have plan to install sql server for my study and I found your blog. I have two computer, one is running windows server 2019 (Domain controller) and one computer will for SQL Server 2014.
When I reach to step create gMSA account, you give DNSHostName is SQLServerEngine.contoso.com, why ‘contoso.com’ ? I notice that many people often use ‘contoso.com’ but I don’t understant why, can we use something else? for example my local domain is sangho.local can I use it?
Can you help me? I really appreciate it.
Sang Ho
June 13, 02:05I don’t understant why you have domain datacommunity.local but you give DNSHostName is SQLServerEngine.contoso.com ? In my opinion that must be SQLServerEngine.datacommunity.local.